How the Quant UX book was written

This post shares high-level technical details of how Kerry Rodden and I wrote the Quant UX book. I start by describing the overall process and then I review how it all comes together in RStudio. (Another time I'll discuss more about the process of deciding whether to write a technical book.)
This may be useful even if you have no intention of writing a book. A similar process will work for many kinds of documents, including analytic projects, reports, academic papers, presentation decks, and complex projects like dissertations.
Our Goals and Overall Choices
After discussing my prior experience with the R book and Python book ([R | Python] for Marketing Research and Analytics), Kerry and I set a few principles and goals for the writing process for the Quant UX book:
We must be able to work asynchronously and merge separate work.
The canonical version must live in the cloud and not depend on a single system or owner.
All code in the book — and everything that flows from it, such as output and charts — must be reproducible and automatically included (no copy/paste).
It should be formatted like a printed book from the beginning, as that is both personally inspiring and useful (e.g., to get approximate page counts and to minimize typesetting surprises in production).
Share a bibliography and include, number, and format references automatically.
As background, the R and Python books were written using LaTeX (in TeXShop), and that solved goal 4 to be fully typeset. Goals 1 and 2 — to work asynchronously and with backup — were solved by using Git. Goal 5 was met by using BibDesk as a reference manager.
However, goal 3 – that the entire project should be fully built and reproducible from a single code base and document – was not solved by using LaTeX alone; the code and graphics for the R and Python books had to be handled somewhat manually. For example, the code files for the R book included additional sections that created print-quality PDF images to include in the LaTeX file. That code had to be stripped from the final code files shared with readers. (I'll skip the details, although FWIW, I wrote additional code that converted the authored versions to "shared" versions.)
To meet the goals for the Quant UX book, we landed on the following technical stack:
Use RStudio to write the book and code together (goal 3), using its built-in "knit" functions. Unlike LaTeX written in a standalone editor, this solves goal 3 by bringing all of the code, output, and graphics into one source and process.
Specifically, use the
bookdownpackage to manage output to a book-like final PDF version.bookdownconverts markdown to LaTeX under the hood, which then creates PDF and/or other formats as desired (goal 4)Use Git to work asynchronously (goal 1), hosted on GitHub (goal 2)
Use BibDesk for references (sharing one
.bibfile in the git repository; goal 5).
In the next sections, I'll briefly show each of those.
RStudio for Writing
The following screenshot shows my actual RStudio project for the book (although I shrank the window & resolution to be more readable here). This file is from Chapter 6.
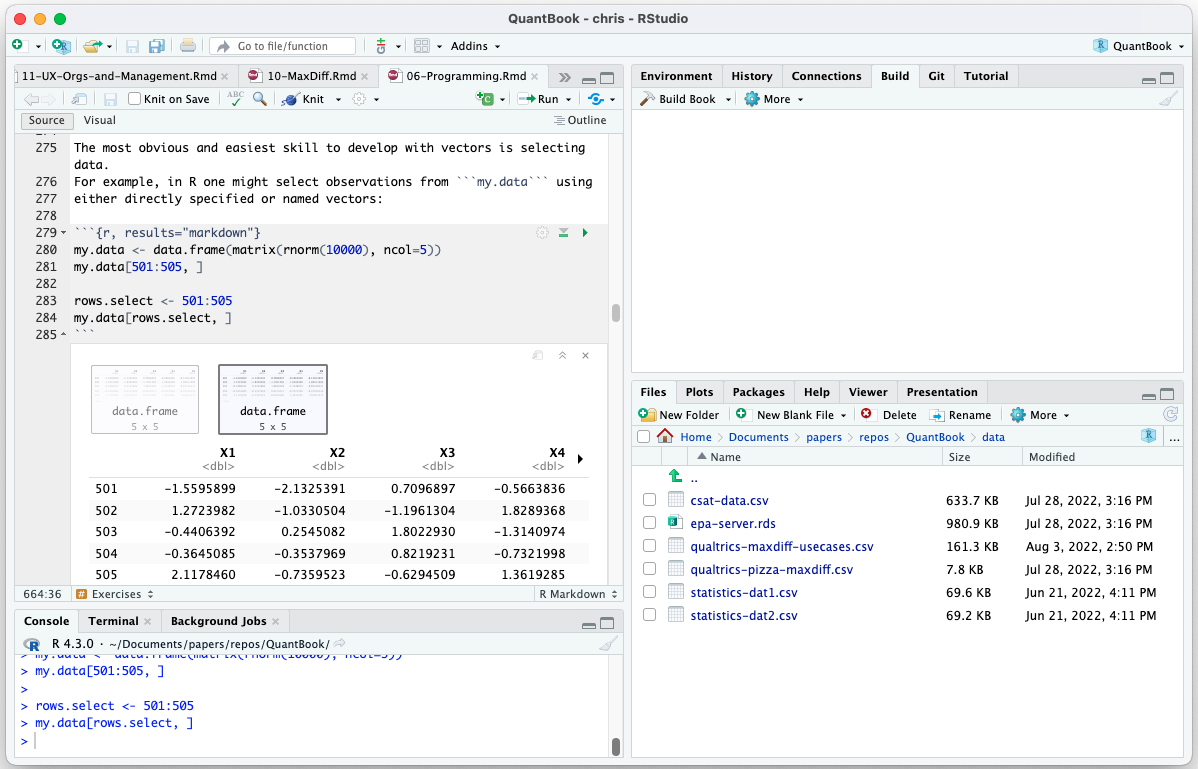
If RStudio knitting is new to you, I'll describe a few things that you can see above.
In the title bar and upper right, you see that I'm working on the "QuantBook" project. By keeping all files for the book in an RStudio project, we separate it from other work. (You can use multiple sessions in RStudio to have different projects open at the same time.)
In the Files pane (lower right), you can see the file path
Home/Documents/papers/repos/QuantBook. I put all of my git repositories under a single/repos/folder to make it simple to track and manage them (for example, to monitor how much space they are taking up).In the Editor pane (upper left), you see some of the actual text from Chapter 6 of the book, which ended up on page 97 in the print edition. The second sentence shows how Rmarkdown can be used for formatting (in this case, using the ticks to format "my.data" as monospaced code font).
The Editor pane also shows how we included R code and its output in the text. The block starting
{r, results="markdown"}is code that is typeset into the book and whose results will also be included. You can also see the results live in the Editor pane, and the actual code execution itself in the R Console window below (lower left).Moving over to the lower right-hand side, the
./data/folder shows some of the auxiliary files we used in the book. We kept those in the git repository and organized in a simple way to make the code clear throughout the book.Finally, in the upper right-hand side, you see the Build pane from RStudio. The Build pane is where the magic happens. When I click "Build Book" it starts at the first chapter, and in each one:
(1) runs all of the R code
(2) converts the markdown text to LaTeX
(3) inserts all of the code, results, and charts into the text
(4) includes bibliography numbers where works are referenced
(5) adds a formatted bibliography at the end, and
(6) compiles all of the chapters to a single PDF file (you could instead compile them to Word or HTML, as desired)
An identical process works for slides, papers, and various other types of documents. We started with a book template but you could instead start with a presentation or other template. (Example: a talk I gave at UseR! 2019 was written as an RStudio presentation add built from Rstudio markdown into slides with code, data, results, and explanatory text; you can see it here.)
There have been various improvements and expansions recently with RStudio's Quarto system for markdown and knitting, but the overall picture is the same.
Git for Collaboration
If you're familiar with Git, then there's probably not much to say here. I created a local repository, hosted it upstream on GitHub, and Kerry was a collaborator.
For those new to Git, I'll point out a few things. First of all, Git is a file-based collaboration system (also known as a version control system). You create a folder (and any subfolders, etc., as needed) and put things there. That is mirrored between your local machine and (usually) an online hosting site such as GitHub or Bitbucket. It is widely used by developers to manage contributions from multiple contributors while separating stable code from experimental, new code.
While working on code — or, in this case, a book — contributors make edits locally and then check them in (known as making a commit). Importantly, when a text file is changed by more than one contributor, the changes can be merged on a line-by-line basis. For instance, if I edited one paragraph of a chapter while Kerry added a new section, our changes would get merged into a single file. In the case of conflicting edits, such as changing the same sentence in two different ways, it shows the conflicts and you can choose which one to retain. All commits are saved and you can go back to a previous version at any time.
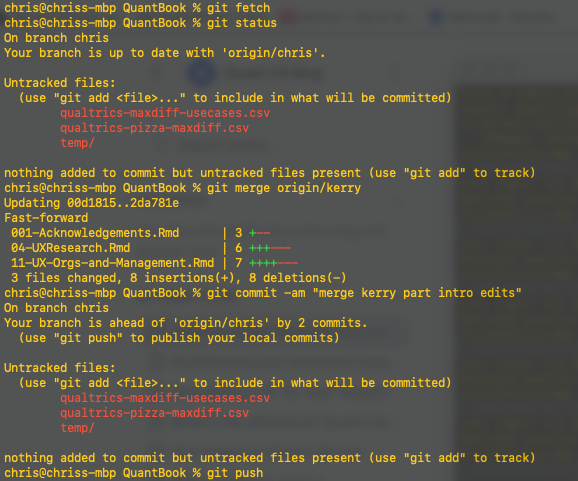
The following screenshot shows my Git command line running in OS X Terminal, for one of our very last commits. At that time, we were updating the Acknowledgements and correcting a couple of typos in other chapters. You can see:
I got the latest edits with
git fetchI checked that my own edits were all up to date with
git statusI merged a few edits from Kerry using
git mergewhich updated 3 files with a total of 8 changes.I saved that with
git commitI uploaded the result back to the shared online repository with
git push
In case you're wondering, you do not have to use Git from the command line. It's integrated into RStudio. But I like using the command line so I know exactly what's going on. In the command line, I only need to remember a few commands, as listed above.
(Side note. One tip: if you use RStudio or TeXShop or any other plain text editor with Git: don't write in paragraphs but in sentences. Git manages changes on a line-by-line basis, and if you write each sentence as a separate line, there will be more granular tracking and fewer conflicting edits. It's also OK to end a line mid-sentence where the text editor wraps. You can see that in the text editor window in the RStudio screenshot above: each sentence is on its own line (or more than one line!), and then there is a blank line to separate paragraphs. The point is to keep the lines short.)
BibDesk for References
BibDesk is a bibliography editor that works with the LaTeX format for references. By having our references in BibDesk, we can simply refer to a "cite key" from BibDesk, and the reference will be handled automatically by RStudio (and the underlying LaTeX engine).
Here's a screenshot of BibDesk and the master reference database we used:
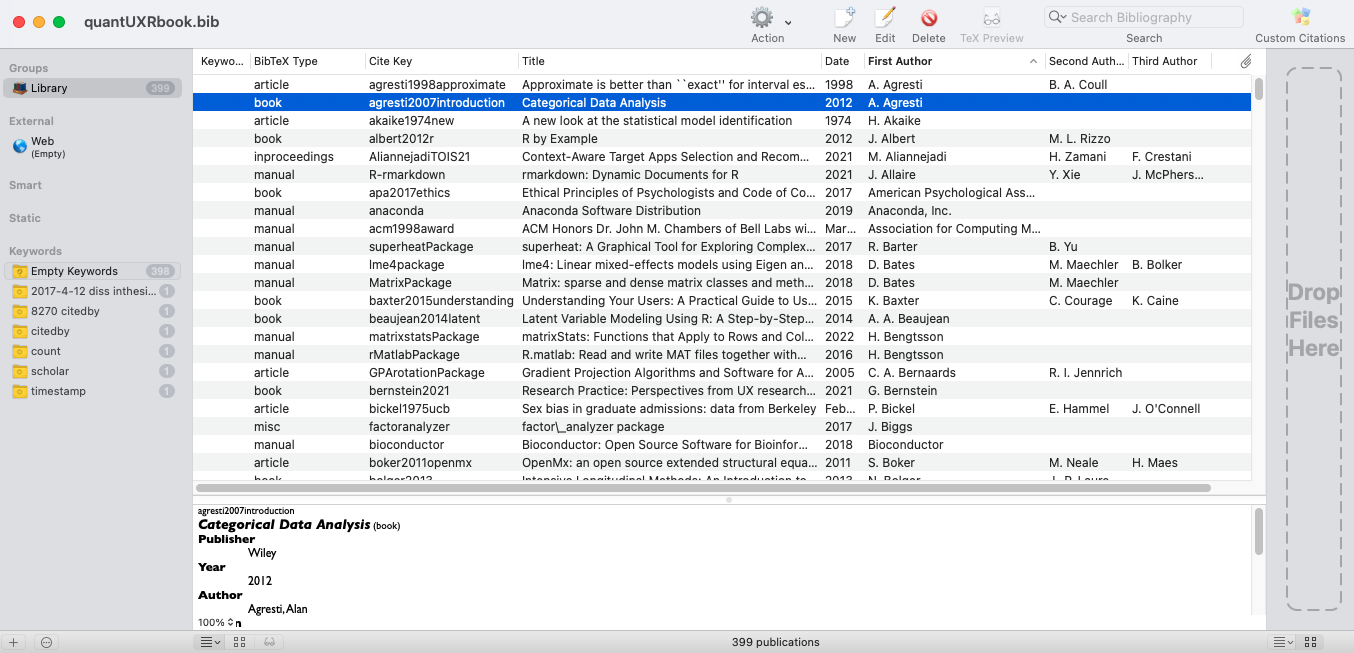
If I wanted to cite the highlighted reference, I could copy the citation key, "agresti2007introduction" and add it in the editor, such as writing:
.. a comprehensive guide to statistical analysis of categorical data [agresti2007introduction].
When the book is "built" the bracketed part will be replaced with whatever reference style has been chosen (we used bracketed numbers, so it would be ), and the full citation will be added to your bibliography at the end of the document.
Other programs do the same thing, but I've stuck with BibDesk for a decade thanks to its simplicity and the fact that I now have hundreds of references in it.
BTW, you might notice that my quantUXRbook library has 399 references but the book itself only has 153 references. LaTeX manages everything automatically so only the references that are cited will appear in the bibliography. Our editor asked us multiple times about that! It seems that uncited references are a common problem in books ... but not in our case, thanks to RStudio + LaTeX.
(Digression: the Agresti citation highlighted in the screenshot is an example of an uncited work — it is cited in the R book but not in the Quant UX book. I copy my bibliography from project to project so there are many uncited works at any time; no problem. By the way, if you're wondering, the Agresti citation key says 2007 because I've cited it for a long time but updated the entry itself to 2012 when a new edition was released. I kept the citation key unchanged so any old docs could automatically reference the new version when they are rebuilt. Whether that makes sense depends on your citation style, such as whether you refer to page numbers that are edition-dependent.)
The Hardest Part (besides actually writing it)
The most difficult thing was setting up the bookdown / LaTeX template to have the customized book-like formatting we wanted (as opposed to a generic template), and to edit that such that we would get correct metadata everywhere (such as the book's title in the margins and title page). This was largely due to the complexity of our project:
a full length book
with multiple kinds of chapters (introduction, text, appendices)
to be typeset with a professional LaTeX class (template)
including a table of contents
and a bibliography
with specific styles for references and other elements
For many projects, you won't need most of those, and it's fine to start writing with a generic template and then update those details later. Because bookdown, Quarto, and LaTeX separate the class definition (formatting directions) from the text itself, you can always tinker with or update the class definition later. (In that way, it is somewhat similar to HTML and CSS. And completely unlike Word.)
For a complex project, you'll end up Googling bookdown options a lot in the beginning. In a nutshell, you probably want to start with the following:
Find a LaTeX class file that matches your desired format. We used the Springer Social Science class with very minor tinkering.
Get a bibliography format file for your preferred style. We used a LaTeX definition for the AMS (American Mathematical Society) style.
Update the bookdown file
_output.ymlto reference those files and to set a few other metadata options (such as the output default style). I've copied our exact_output.ymlfile below.Update the LaTeX file
preamble.texfor LaTeX options to apply project-wide. For instance, we defined a "bullet" character macro and set up our bibliography. I've copied that below, too!
Our _output.yml file, just for reference as you read about the options there:
bookdown::gitbook:
  toc_depth: 3
  css: style.css
  config:
    toc:
      before: |
        <li><a href="./">Quantitative User Experience Research</a></li>
#      after: |
#        <li><a href="https://github.com/rstudio/bookdown" target="blank">Published with bookdown</a></li>
    edit: https://github.com/rstudio/bookdown-demo/edit/master/%s
    download: ["pdf", "epub"]
bookdown::pdf_book:
  toc_depth: 3
  includes:
    in_header: preamble.tex
  latex_engine: xelatex
  citation_package: default
  keep_tex: yes
  pandoc_args: [ "--csl", "springer-socpsych-brackets.csl" ]
bookdown::epub_book: default
And here is our preamble.tex file, again for reference (Hashnode does not have LaTeX code formatting, so this file has no syntax highlighting):
\usepackage{booktabs}
\usepackage{amsthm}

\usepackage[hyphens]{url}

\usepackage{graphicx}
\newcommand\sbullet[1][.6]{\mathbin{\vcenter{\hbox{\scalebox{#1}{$\bullet$}}}}}

\makeatletter
\def\thm@space@setup{%
  \thm@preskip=8pt plus 2pt minus 4pt
  \thm@postskip=\thm@preskip
}

\makeatother

% following adds bibliography to TOC
% from https://github.com/rstudio/bookdown/issues/192
\usepackage{makeidx}
\makeindex
\usepackage[nottoc]{tocbibind}
Don't let those scare you! To repeat, we wanted to format the result exactly like a typeset book. For many projects, it will work fine out of the box. But if you want to do advanced LaTeX formatting, the power is there.
FWIW, when we handed off the book to the publisher, we gave them the final PDF build, plus higher-resolution graphics files for the charts.
The final book that you see – in print and in eBook format – was built directly from the PDF files that we handed off to the publisher. At no point was there any messing with Microsoft Word or the like! The same was true for all three books, the Quant UX book, the R book, and the Python book.
Wait, should I learn LaTeX?
If you are reasonably fluent in R, and have a significant project similar to our requirements above — inline code with reproducible typesetting, and wanting a professionally formatted result — then I'd say, yes. LaTeX will give you a lot of power.
Except I'd rephrase the question. You don't really have to learn LaTeX but rather deal with it only slightly while working with the much simpler R markdown / Quarto system in RStudio.
There are a few contraindications when I recommend NOT to use RStudio markdown:
When your coauthors have no interest in either coding or R
When you wish to use an writers' composition platform (such as Scrivener)
If you have code that RStudio can't compile and include automatically
Generally if it is a creative project whose mindset doesn't connect with a technical writing stack. If I were to write a novel, I probably would not use RStudio (and yet I'd be even less likely to use Word!)
Learning More
TBH, the best and probably only way to learn about making production-quality articles, presentations, and books in RStudio is to do it.
Although there are books available about R markdown, bookdown, LaTeX, and other parts of the technical stack, in my experience, you will end up Googling everything. Start with the templates in RStudio and then customize from there.
I hope this article will get you started (or maybe convince you not to start) and give a few pointers. Cheers and happy writing!